This chapter completes our discussion of the instructions built into the robot programming language vocabulary. The two new instructions we will learn are FOR-LOOP and WHILE. Both instructions can repeatedly execute any instruction that a robot understands, including nested FOR-LOOP and WHILE instructions. These additions greatly enhance the conciseness and power of the robot programming language. In Section 6.7 we will construct a complex robot program by using stepwise refinement and all of the instructions we have learned.
Since we are becoming experienced robot programmers, an abbreviated view of the robot world will be used for some figures. To reduce visual clutter, the street and avenue labels and, occasionally, the southern or western boundary walls will not be shown. As usual, our examples will use a single robot, often named Karel. Since most of our examples will involve manipulation of beepers, we suppose that we are building a class named BeeperController.
When we program a robot, having it repeat an instruction a certain number of times is sometimes necessary. We previously handled this problem by writing the instruction as many times as needed. The FOR-LOOP instruction gives us a mechanism which allows Karel to repeat another instruction a specified number of times. Here we will introduce a simple form of a powerful Java statement. One can actually do much more with this statement than we will here, however. Before we introduce it, we need to say a few things about a kind of data that is built into Java, but not used much in robot programs. An int variable represents a subset of the integers of mathematics. The range of allowed values is from approximately - 2 billion to + 2 billion. Strictly speaking it is from - 231 to + 231 - 1. The values that an int can hold are familiar to you as values such as -85, and 42. A variable of type int can hold one of these values at a time, and the value can be changed in an assignment. For example, we can create and initialize an int with
int x = 0;
We can then later give it a different value with
x = 42;
Note that the declaration only occurs once. One way to change a value is to give an int a value one more than its current value. This is simply done with just
x++;
If x had value 42 before executing this, then it has value 43 afterwards.
By the way, it isn't often necessary to know this, but if you increment the largest positive value, you get the smallest negative one.
In Java and in the Robot programming language, a simple FOR-LOOP has the following structure.
for (int <variable-name> = 0; <variable-name> < <positive-number>; <variable-name> ++)
{
	<instruction-list>
}
This instruction introduces the reserved word for. The bracketed word <positive-number> tells the robot how many times to execute the instruction list that replaces <instruction-list>. We refer to <instruction-list> as the body of the FOR-LOOP instruction. The three instances of <variable-name> are to be replaced with any convenient name. This instruction is called FOR-LOOP because one can imagine the instructions of the <instruction-list> arranged in a circle. If we execute them one after the other, we will come to the first one just after the last one. Our first example of a FOR-LOOP instruction is an alternate definition of turnRight. Here we have used i as the <variable-name>. Notice there are three integer values that are >= 0 and < 3, namely [0, 1, 2 ].
public class BeeperController extends Robot
{
	public void turnRight()
	{	for (int i = 0; i < 3; i++)
		{ 	turnLeft();
		}
	}
...
}
The body of the FOR-LOOP will be executed three times, once when i is 0, once when it is 1, and again when it is 2. The three parts of the loop control in parentheses are separated by semicolons. The first is called the initialization. The second is the termination test. The last is executed after each of the repeated executions of the body. So, in effect, the above FOR-LOOP is equivalent to the following seven statements.
int i = 0;
turnleft();
i++; // i is now 1
turnleft();
i++; // i is now 2
turnLeft();
i++; // i is now 3
The FOR-LOOP is actually much more flexible than what we use here, but this simple form is an important idiom and should be learned. It is all that we need for now.
As a second example, we rewrite the harvestOneRow method that was written in Section 3.8.3. This definition originally comprised nine primitive instructions, but by using FOR-LOOP we can define the method more concisely. With this new, more general version of harvestOneRow, we can now easily increase or decrease the number of beepers harvested per row; all we need to change is <positive-number> in the FOR-LOOP instruction.
public class Harvester extends Robot
{
	public void  harvestOneRow()
	{	harvestCorner();
		for (int i = 0; i < 4; i++)
		{	move();
			harvestCorner();
		}
	}
...
}
Remember that the robot is originally on a corner with a beeper, so we need to harvest the first corner before we move. The above is equivalent to the following version, however. In this version we must remember to harvest the last corner after the loop completes, since we ended with a move and have only harvested the first four corners in this row.
public void harvestOneRow()
{	for (int i = 0; i < 4; i++)
	{	harvestCorner();
		move();
	}
	harvestCorner();
}
Finally, we show one FOR-LOOP instruction nested within another. Carefully observe the way that the inner loop both begins and ends within the outer loop. The <variable-name> of the control variable must be different for each loop.
public void walkSquareOfLength_6()
{	for (int i = 0; i < 4; i++)
	{	for (int j = 0; i < 6; i++)
		{	move();
		}
	turnLeft();
	}
}
If we assume no intervening walls, this instruction moves the robot around the perimeter of a square whose sides are six blocks long. The outer FOR-LOOP instruction loops a total of four times, once for each side of the square. Each time the outer FOR-LOOP's body is executed, the robot executes two instructions. First the robot executes the nested FOR-LOOP, which moves it six blocks. Then it executes the turnLeft, which prepares it to trace the next side. Thus, the robot executes a total of twenty-four moves and four left turns, which are arranged in an order that makes it travel in a square.
In this section we explain the WHILE instruction and analyze many of its interesting properties. It is the most powerful instruction that is built into the robot vocabulary.
To motivate the need for a WHILE instruction, we look at what should be a simple programming task. Assume that a robot is initially facing east on some street, and somewhere east of it on that same street is a beeper. The robot's task is to move forward until it is on the same corner as the beeper, and then pick it up. Despite this simple description, the program is impossible to write with our current repertoire of instructions (1). Two attempts at solving this problem might be written as follows.
FOOTNOTE 1. Unless we use the technique called recursion that is discussed in Chapter 6.
if ( ! nextToABeeper())			loop (  ? )
{	move;				{	move();
}					}
if ( ! nextToABeeper()) 		pickBeeper();
{	move();
}
		.
		.
		.
if ( ! nextToABeeper())
{ 	move();
}
pickBeeper();
We can interpret what is meant by these instructions, but robots understand neither ". . . " nor "?". The difficulty is that we do not know in advance how many move instructions the robot must execute before it arrives at the same corner as the beeper; we do not even have a guaranteed upper limit! The beeper may be on the robot's starting street corner, or it may be a million blocks away. The robot must be able to accomplish this task without knowing in advance the number of corners that it will pass before reaching the beeper. We must program our robot to execute move instructions repeatedly, until it senses that it is next to the beeper. What we need is an instruction that combines the repetition ability of the FOR-LOOP instruction with the testing ability of the IF instruction.
The WHILE instruction commands a robot to repeat another instruction as long as some test remains true. The WHILE instruction is executed somewhat similarly to an IF instruction, except that the WHILE instruction repeatedly executes itself as long as <test> is true. The general form of the WHILE instruction is given below.
while ( <test> )
{
	<instruction-list>
}
The new reserved word while starts this instruction, the parentheses enclose <test>, and braces enclose the <instruction-list> in the usual way. The conditions that can replace <test> are the same ones used in the IF instructions.
A robot executes a WHILE loop by first checking <test> in its current situation. If <test> is true, the robot executes <instruction-list> and then reexecutes the entire WHILE loop. If <test> is false, the robot is finished with the WHILE instruction, and it continues by executing the instructions following the entire WHILE loop. Here is a sample WHILE instruction, which solves the problem that began this discussion.
public class BeeperController extends Robot
{
	public void goToBeeper()
	{	while ( ! nextToABeeper())
		{	move();
		}
	}
...
}
This method moves a robot forward as long as nextToABeeper is false. When the robot is finally next to a beeper, it finishes executing the WHILE loop. The following method is another simple example of a WHILE loop, and we will examine its behavior in detail.
public void clearCornerOfBeepers()
{	while ( nextToABeeper() )
	{	pickBeeper();
	}
}
Suppose we have a robot named Karel in class BeeperController and send it the message Karel.clearCornerOfBeepers. This method commands Karel to pick up all of the beepers on a corner. Let's simulate Karel's execution of this instruction on a corner containing two beepers. Karel first determines whether nextToABeeper is true or false. Finding the test true, it executes the body of the WHILE loop, which is the pickBeeper message. Karel then reexecutes the entire WHILE loop. The robot finds <test> is true (one beeper is still left), and executes the body of the WHILE loop. After picking up the second beeper, Karel reexecutes the entire WHILE instruction. Although we know that no beepers are remaining, Karel is unaware of this fact until it rechecks the WHILE loop test. Now Karel rechecks the test and discovers that nextToABeeper is false, so the robot is finished executing the WHILE loop. Because the entire definition consists of one WHILE loop, Karel is finished executing clearCornerOfBeepers. It appears that no matter how many beepers are initially on the corner, Karel will eventually pick them all up when this instruction is executed.
But what happens if Karel executes clearCornerOfBeepers on a corner that has no beepers? In this situation, <test> is false the first time that the WHILE instruction is executed, so the loop body is not executed at all. Therefore, Karel also handles this situation correctly. The key fact to remember about a WHILE instruction is that until Karel discovers that <test> has become false--and it may be false the first time--Karel repeatedly checks <test> and executes the loop's body.
In the previous chapter on IF's we discussed the problems novice programmers frequently face when introduced to a new programming construct. We are in a similar situation with the WHILE loop. We have seen the form of a WHILE loop, looked at an example, and traced the execution of the example. Before using a WHILE loop in a robot program, it would be helpful to have a framework for thinking about the WHILE loop.
We should consider using a WHILE loop only when a robot must do something an unknown number of times. If we are faced with such a situation, we can build our WHILE loop by following the four step process shown below. To illustrate these steps, we will again use the problem of having a robot named Karel pick all beepers from a corner without knowing the initial number of beepers on the corner.
Step 1: Identify the one test that must be true when Karel is finished with the loop.
In the above problem, Karel must pick all beepers on the corner. If we consider only tests that involve beepers we have four from which to choose: anyBeepersInBeeperBag, nextToABeeper, and their opposites. Which one is the test we want? When Karel is finished, there should be no beepers left on the corner, so the test we want to be true is
! nextToABeeper().
Step 2: Use the opposite form of the test identified in step 1 as the loop <test>.
This implies we should use nextToABeeper. Does this make sense? The WHILE instruction continues to execute the loop body as long as the test is true and stops when it is false. As long as Karel is next to a beeper it should pick them up. When it is done, there will be no beepers on the corner.
Step 3: Within the WHILE, make progress toward completion of the WHILE. We need to do something within the WHILE to ensure that the test eventually evaluates to false so that the WHILE loop stops. Often it is helpful to do the minimum amount of work that is necessary to advance toward the completion of the task.
Something within the body of the loop must allow the test to eventually evaluate to false or the loop will run forever. This implies that there must be some instruction (or sequence of instructions) within the loop that is related to the test. In this problem, what must be done to bring us closer to the test being false? Since we are testing for nextToABeeper, we must pick one (and only one) beeper somewhere in the loop. We can argue that if Karel keeps picking one beeper, it must eventually pick all the beepers leaving none on the corner. Why pick only one beeper during each iteration? Why not two or three? If there is only one beeper on the corner, and we instruct Karel to pick up more than one, an error shutoff will occur. Picking just one beeper during each iteration of the loop is the minimum needed to guarantee that all the beepers are eventually picked up.
Step 4: Do whatever is required before or after the WHILE instruction is executed to ensure we solve the given problem.
In this example, we have to do nothing before or after the loop. However, there are times when we may miss one iteration of the loop and have to "clean things up" which can be done either before or after the WHILE. Also, we sometimes need to execute an instruction or two before the WHILE loop to get our robot into the correct position.
If we follow these four steps carefully, we reduce the chance of having intent errors and infinite repetition when we test our program. Infinite execution is the error that occurs when we begin to execute a WHILE instruction, but it never terminates. This is discussed in Section 6.3.2.
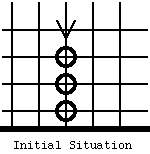
Let's apply the steps presented above to a new problem. A robot named Karel is somewhere in the world facing south. One beeper is on each corner between Karel's current position and the southern boundary wall. There is no beeper on the corner on which Karel is currently standing. Write a new method, clearAllBeepersToTheWall, to pick all of the beepers.

Figure 6-1 Pick All Beepers
As before, let's ask ourselves some questions:
Question: What do we know about Karel's initial situation?
Answer: Karel is facing south.
Karel is an unknown distance from the southern boundary wall.
Each corner between Karel and the southern boundary wall has one beeper.
Question: Does any of this information provide insight toward a solution?
Answer: Karel can travel forward until it reaches the southern boundary wall. It can pick a beeper from each corner as it travels.
We have the beginnings of a plan. We continue the process below.
Question: What robot instruction can we use to keep Karel traveling southward until it reaches the southern boundary wall?
Answer: Since traveling to the southern boundary wall requires an unknown number of move instructions, we can use a WHILE loop.
Question: How do we actually use the WHILE loop?
Answer: We can use the four step process as follows:
Step 1: Identify the one test that must be true when Karel is finished with the loop. Karel will be at the southern boundary wall, so the test, frontIsClear, will be false so ! frontIsClear will be true.
Step 2: Use the opposite form of the test identified in step 1 as the loop <test>. frontIsClear is the opposite form.
Step 3: Do the minimum needed to ensure that the test eventually evaluates to false so that the WHILE loop stops. Karel must move forward one block within the loop body, but we must be careful here. Karel is not yet standing on a beeper so it must move first before picking the beeper. We can use a single pickBeeper instruction because there is only one beeper on each corner.
Step 4: Do whatever is required before or after the WHILE is executed to ensure we solve the given problem. Since Karel is already facing south, we do not have to do anything.
Based on the above discussion we can write the following new method:
public void clearAllBeepersToTheWall()
{	while ( frontIsClear())
	{	move();
		pickBeeper();
	}
}
Our work is not finished. We must carefully trace the execution before we certify it as correct. Can we test all possible situations that Karel could start this task in? No! We cannot test all possible situations but we can test several and do a reasonable job of convincing ourselves that the method is correct. One method of informally reasoning about the instruction follows.
First: Show that the method works correctly when the initial situation results in the test being false. That would mean that the initial situation would look like this:

Figure 6-2 The Same Task Without Beepers
Second: We must show that each time the loop body is executed, Karel's new situation is a simpler and similar version of the old situation. By simpler we mean that Karel now has less work to do before finishing the loop. By similar we mean that Karel's situation has not radically changed during its execution of the loop body (in this example a non-similar change could mean that Karel is facing a different direction). If our new method is correct, we should see these changes in the following Karel world:

Figure 6-3 Tracing Karel's Progress Executing the Loop
After each iteration of the loop, the current corner should have no beepers. Take some time and trace the robot's execution of the loop and verify that it is correct.
The WHILE loop provides a powerful tool for our robot programs. Using it wisely, we can instruct robots to solve some very complex problems. However, the sharper the ax, the deeper it can cut. With the power of the WHILE loop comes the potential for making some powerful mistakes. This section will examine several typical errors that can be made when using the WHILE loop. If we are aware of these errors, we will have a better chance of avoiding them or, at least, an easier time identifying them for correction.
If we order five fence sections, how many fence posts do we need? The obvious answer is five! But it is wrong. Think about it.

Figure 6-4 The Fence Post Problem
This diagram should help us to understand why the correct answer is six. We can encounter the fence post problem when using the WHILE loop. Let's take the previous problem with a slight twist and put a beeper on Karel's starting corner.
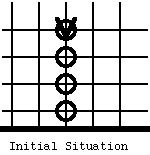
Figure 6-5 Initial Situation
Since this is a slight modification of the clearAllBeepersToTheWall task of the class BeeperController, it would be advantageous to have solutions to both problems available. One good way to do this is to build a new class, say BeeperSweeper, derived from BeeperController, in which to implement this new method, which is just an override of clearAllBeepersToTheWall.
Suppose we decide to solve this problem by reversing the order of the messages in the original loop body and have Karel pick the beeper before moving:
public class BeeperSweeper extends BeeperController
{
	void  clearAllBeepersToTheWall()
	{	while ( frontIsClear() )
		{	pickBeeper();
			move();
		}
	}
...
}
If we trace the method's execution carefully, we will discover that the loop still finishes--there is no error shutoff--however, the southernmost beeper is not picked.

Figure 6-6 Final Situation
In this example the beepers were the fence posts and the moves were the fence sections. The WHILE loop executes the same number of pickBeeper and move messages. Consequently, there will be one beeper left when the loop finishes. This is where step 4 in the four step process comes in. We now have a situation where we must do something before or after the loop to make sure we solve the given problem. There are at least two ways to handle this. Here is one.
public void clearAllBeepersToTheWall()
{	while ( frontIsClear() )
	{	pickBeeper();
		move();
	}
	pickBeeper();
}
Our solution is simply to pick the final beeper after the WHILE loop stops executing. What is the other way to solve this fence post problem? Ah yes. We could pick up the beeper on the start corner first. This would put us in the initial position of BeeperController :: clearAllBeepersToTheWall. This means that we can actually use that instruction to write this one.
public void clearAllBeepersToTheWall()
{	pickBeeper();
	super.clearAllBeepersToTheWall();
}
Having looked at step 4 in the four step process, let's now refocus our attention on step 3: do what is needed to ensure that the test eventually evaluates to false so that the WHILE loop stops. Sometimes we forget to include an instruction (or sequence of instructions) the execution of which allows the test eventually to become false. Here is an example:
while  ( facingNorth() )
{	pickBeeper();
	move();
}
Look at this loop carefully. Is there any instruction within the loop body that will change the robot's direction? Neither pickBeeper nor move does so. The loop will iterate zero times if the robot is initially facing any direction other than north. Unfortunately, if it is facing north we condemn the robot to walk forever (since the world is infinite to the north) or to execute an error shutoff if it arrives at a corner without a beeper2. We must be very careful when we plan the body of the WHILE loop to avoid the possibility of infinite repetition.
FOOTNOTE 2. Of course if we have overridden pickBeeper or move then anything is possible. One of the new versions could change the direction, and then the robot would exit the WHILE.
Section 6.2.2 explained how a robot executes a WHILE instruction, yet unless the instruction is read carefully, there may be some ambiguity. In this section we closely examine the execution of a WHILE instruction and explain a common misconception about when a robot checks <test>. Let's examine the following instruction carefully.
public void harvestLine()
{	while ( nextToABeeper() )
	{	pickBeeper();
		move();
	}
}
This method commands a robot to pick up a line of beepers. The robot finishes executing this method after moving one block beyond the final corner that has a beeper.
Let's simulate this new method in detail for a line of two beepers. Karel starts its task on the same corner as the first beeper. The robot is again named Karel. Karel executes the WHILE instruction and finds that the test is true, so it executes the body of the loop. The loop body instructs Karel to pick up the beeper and then move to the next corner. Now Karel reexecutes the loop; the test is checked, and again Karel senses that it is next to a beeper. The robot picks up the second beeper and moves forward. Karel then executes the loop again. Now when the test is checked, the robot finds that its corner is beeperless, so it is finished executing the WHILE loop. The definition of harvestLine contains only one instruction--this WHILE loop--so harvestLine is also finished.
The point demonstrated here is that Karel checks <test> only before it executes the body of the loop. Karel is totally insensitive to <test> while executing instructions that are inside the loop body. A common misconception among novice programmers is that Karel checks <test> after each instruction is executed inside the loop body. This is an incorrect interpretation of when Karel checks <test>.
Let's see what would happen if Karel used the incorrect interpretation to execute the harvestLine method in the two-beeper situation. This interpretation would force Karel to finish the WHILE loop as soon as it was not next to a beeper. Karel would start by determining if it were next to a beeper. Finding the test true, Karel would execute the loop body. This is fine so far but, after executing the pickBeeper, Karel would not be next to a beeper anymore. So, according to this incorrect interpretation, Karel would now be finished with the loop and would be limited to picking up only one beeper regardless of the length of the beeper line.
Recall again the fence sections and fence posts. Notice that the body of a while is like a fence section and the test is like a fence post. The number of test evaluations is always one more than the number of executions of the body of the WHILE instruction.
We have already discussed nesting, or the placing of one instruction within a similar instruction. Nesting WHILE loops can be a very useful technique if done properly and in this section we will look at both a good and a bad example of nesting.
6.4.1 A Good Example of Nesting
We will use a modification of a previous problem. A robot named Karel is somewhere in the world facing south. Between its current location and the southern boundary wall are beepers. We do not know how many beepers are on each corner (some corners may even have no beepers). Write a new method that will direct Karel to pick all the beepers between its current location and the southern boundary wall.
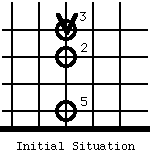
Figure 6-7 A Problem to Move and Pick Beepers
We can use our question/answer format to plan a solution to this problem.
Question: What is the problem?
Answer: We must move Karel an unknown distance and have Karel pick an unknown number of beepers from each corner it passes.
Question: What does Karel have to do?
Answer: Karel must perform two tasks:
- First, Karel must walk an unknown distance to the southern wall.
- Second, Karel must pick all the beepers on each corner it encounters. There may be from zero to a very large number of beepers on each corner.
Let's concentrate on the first task and save the second task for later.
Question: What instruction can we use to keep Karel moving forward to the southern boundary wall?
Answer: Since this requires an unknown number of iterations of the move instruction, we can use the WHILE loop.
We can apply the four step process for building WHILE loops and write the following code for Karel to test.
while  ( frontIsClear() )
{	move();
}
If Karel executes this instruction correctly, then our plan is on the right track. However, if Karel stops before arriving at the boundary wall or executes an error shutoff when it tries to move through the wall, we must reanalyze our plan. This instruction works properly so we now consider the second task--the picking of all beepers on each corner Karel encounters as it travels to the boundary wall.
Question: What instruction will allow Karel to pick all the beepers that might be on a corner?
Answer: Since this requires an unknown number of iterations of the pickBeeper instruction, we can use the WHILE instruction to do this task also.
We can apply the four step process for building WHILE loops and write the following implementation.
while  ( nextToABeeper() )
{	pickBeeper();
}
We simulate this and it appears to work. We now have to decide which loop to nest inside which loop. Do we put the loop that moves Karel to the southern boundary wall inside the loop that picks beepers or do we put the beeper picking loop inside the loop that moves Karel to the wall?
Question: Can we interchange these two actions?
Answer: No, we cannot. Arriving at the wall should stop both Karel's moving and picking. Running out of beepers on one corner should NOT stop Karel's moving to the wall. As we move to the wall we can clean each corner of beepers if we nest the beeper picking loop inside the loop that moves Karel to the wall.
Our new method definition will look like this.
public void clearAllBeepersToTheWall()
{	while ( frontIsClear() )
	{	while ( nextToABeeper() )
		{	pickBeeper();
		}
		move();
	}
}
To solve the problem of deciding which WHILE loop is to be the outer loop, we can apply the each test. Do we need to pick up all of the beepers for each single step we take to the wall, or do we need to walk all the way to the wall for each single beeper that we pick up? Here, the answer is the former and the outer loop is the stepping (move) loop.
When we nest WHILE loops we must be very sure that the execution of the nested loop (or inner loop) does not interfere with the test condition of the outer loop. In this problem the inner loop is responsible for picking beepers. The outer loop is responsible for moving the robot. These two activities do not affect each other so the nesting seems correct.
We are not done. We must now test this new method. Take some time and trace Karel's execution of it using the initial situation shown in Figure 6.7. As much as we would like to believe it is correct, it isn't. We appear to have forgotten the fence post discussion of section 6.3.1. The way we have written the new method, the last corner will not be cleared of beepers; this last corner is our forgotten fence post. To ensure the last corner is cleared of beepers, we must make one more modification.
public void clearAllBeepersToTheWall()
{	while ( frontIsClear() )
	{	while ( nextToABeeper() )
		{	pickBeeper();
		}
		move();
	}
	while ( nextToABeeper() )
	{	pickBeeper();
	}
}
This third loop is outside the nested loops and it will clear the last corner of beepers.
One note here about overall design of our new method: As a rule we prefer to perform only one task (e.g., moving to a wall) in a new method and move secondary tasks (e.g., picking the beepers) into a different new method. We believe the following represents a better programming style for the previous problem.
public void clearBeepersThisCorner()
{	while ( nextToABeeper() )
	{	pickBeeper();
	}
}

public void clearAllBeepersToTheWall()
{	while ( frontIsClear() )
	{	clearBeepersThisCorner();
		move();
	}
	clearBeepersThisCorner();
}
This programming style is easier to read and, if we suddenly find that clearing the beepers requires a different strategy, we only have to make a change in one place, clearBeepersThisCorner.
A robot named Karel is facing south in the northwest corner of a room that has no doors or windows. Somewhere in the room, next to a wall, is a single beeper. Instruct Karel to find the beeper by writing the new method, findBeeper.
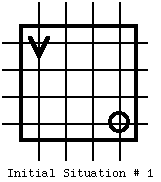
Figure 6-8 Initial Situation
We begin with our usual question/answer planning.
Question: What is the problem?
Answer: We must instruct Karel to find a beeper that is somewhere in the room next to the wall. We do not know how far away it is, and we do not know how big the room is.
Question: What instruction can we use to move Karel to the beeper?
Answer: Since the distance Karel must travel is unknown, we can use a WHILE loop.
Using the four step process to build a WHILE loop we develop the following new method.
public void findBeeper()
{	while  ( ! nextToABeeper() )
	{	move();
	}
}
If we carefully analyze this new method, we find, as shown in Figure 6-9, that Karel executes an error shutoff when it arrives at the southern wall.
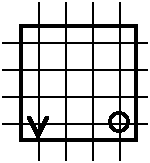
Figure 6-9 Karel Executes an Error Shutoff
Question: What happened?
Answer: We forgot about turning Karel at the corners.
Question: How can we fix this problem?
Answer: Let's walk Karel forward until it detects a wall.
Question: What instruction can we use to do this?
Answer: Since the distance Karel must travel is unknown, we can use a WHILE loop.
Again we use the four step process to build a nested WHILE loop and develop the following new method.
public void findBeeper()
{	while ( ! nextToABeeper() )
	{	while ( frontIsClear() )
		{	move();
		}
		turnLeft();
	}
}
We must test this to see if it works. Since this problem is somewhat involved, we should use several different initial situations. Will the following situations be sufficient to test our code completely?
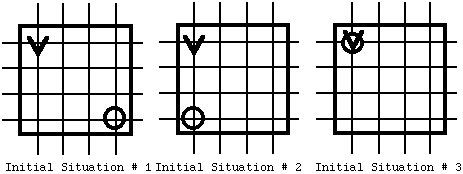
Figure 6-10 Three Different Initial Situations
If we trace our program using these situations, it appears that our method is correct. However, does the original problem statement guarantee that the beeper will always be in a corner? It does not. The original problem statement says that the beeper is somewhere next to a wall. Our three test situations each put the beeper in a corner. We should try an initial situation such as this.
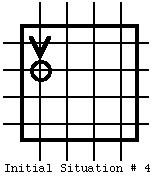
Figure 6-11 Another Situation With Which to Test Our method Definition
Let's see what happens here: Karel makes the outer test, ! nextToABeeper, and it is true so it begins to execute the outer loop body.
Karel makes the inner test, frontIsClear, which is true so Karel moves forward one block coming to rest on the corner with the beeper. What happens now? Karel remains focused on the inner loop. It has not forgotten about the outer loop but its focus is restricted to the inner loop until the inner loop stops execution. Karel is required to make the inner test, frontIsClear, which is true and moves one block forward away from the beeper. This is now Karel's situation.
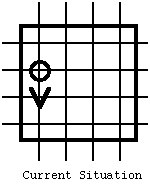
Figure 6-12 Karel Misses the Beeper
Karel remains focused on the inner loop and makes the inner test again. It is true so Karel executes the move and is now in this situation:
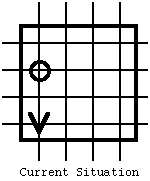
Figure 6-13 Karel Arrives at the Wall
The inner test is false, so Karel ceases execution of the inner loop, executes the turnLeft and is done with the first iteration of the outer loop. Now Karel makes the outer test, !nextToABeeper, which is true. Karel has no memory of once standing next to a beeper, consequently, Karel will continue to walk around this room and keep going and going and going . . . Our method will execute infinitely in this case!
There must be something wrong with our initial reasoning. Let's look at the initial planning segment.
Question: What is the problem?
Answer: We must instruct Karel to find a beeper that is somewhere in the room next to a wall. We do not know how far away it is, and we do not know how big the room is.
Question: What instruction can we use to move Karel to the beeper?
Answer: Since the distance Karel must travel is unknown, we can use a WHILE loop.
We then found that Karel performed an error shutoff because we instructed Karel to move forward when the front was blocked by a wall. Our next planning segment appears below.
Question: What happened?
Answer: We forgot about turning Karel at the corners.
Question: How can we fix this problem?
Answer: Let's walk Karel forward until it detects a wall.
Question: What instruction can we use to do this?
Answer: Since the distance Karel must travel is unknown, we can use a WHILE loop.
This is where our plan began to go wrong. We decided to walk Karel forward until the front was blocked. We reasoned that we could use a WHILE loop to move Karel forward and that was the mistake. If the robot moves more than one block forward without allowing the test of the outer WHILE loop to be checked, it will violate step 4 of the four step process--"Do whatever is needed to ensure the loop stops." Karel should only move one block forward within the outer WHILE loop. We should not use an inner WHILE loop to move Karel toward the wall! The reason is that Karel's execution of the inner WHILE loop can cause the outer WHILE loop to never stop. Both the outer and inner WHILE loops require Karel to execute the move instruction so both loops will eventually terminate. Unless both tests, ! nextToABeeper and frontIsClear, are false at the exact same time, the outer loop will never stop. We must discard the inner WHILE loop and find a different way to keep Karel from trying to move through the wall.
Question: How can we move Karel forward without the WHILE loop?
Answer: Karel should only move forward one block inside the WHILE loop so we must use an IF/ELSE statement to check for a wall. Karel will move when the front is clear and turn left when a wall is present.
Following our new reasoning, we have the following new method.
public void findBeeper()
{	while ( ! nextToABeeper() )
	{	if ( frontIsClear() )
		{	move();
		}
		else
		{	turnLeft();
		}
	}
}
Nesting WHILE loops is a powerful programming idea, but with this increased power comes the increased need for very careful planning and analysis.
An alternate way to solve this is to start as we did previously with a simple while loop, but suppose the existence of an method moveTowardBeeper.
public void findBeeper()
{	while ( ! nextToABeeper() )
	{	moveTowardBeeper();
	}
}
What do we have to do to move toward the beeper? If we don't interpret it literally, but rather as "make one step of progress toward the goal of finding the beeper" then we easily arrive at:
public void moveTowardBeeper()
{	if ( frontIsClear() )
	{	move();
	}
	else
	{  	turnLeft();
	}
}
Novice programmers frequently use WHILE and IF instructions in a conflicting, unnecessary, or redundant manner. Examine the following program fragments to find improperly used tests.
if ( facingSouth() )
{	while ( ! facingSouth() )
	{	turnLeft();
	}
}
In this fragment there are conflicting tests. When the IF's test is true the WHILE's test must be false. This fragment will do nothing.
Let's try another one.
while ( ! frontIsClear())
{	if ( frontIsClear())
	{  	 move();
	}
	else
	{  	turnLeft();
	}
}
In this fragment there is an unnecessary test. When the WHILE's test is true, the IF's test must be false so the ELSE is the only part of the loop body that is ever executed.
Here is another.
while ( nextToABeeper() )
{	if ( nextToABeeper() )
	{  	pickBeeper();
	}
}
In this fragment there are redundant tests. The WHILE's test is the same as the IF's test. When the WHILE's test is true so is the IF's.
Problems such as these usually enter our programs when we attempt to fix execution or intent errors. We sometimes get so involved in the details of our program that we forget to take a step back and look at the overall picture. It is often very helpful to take a break and come back to the program with fresh eyes.
In section 6.2.3 we discussed the four step process for building a WHILE loop.
1. Identify the one test that must be true when the robot is finished with the loop.
2. Use the opposite form of the test identified in step 1 as the loop <test>.
3. Do what is needed to make progress toward solving the problem at hand and also ensure that the test eventually evaluates to false so that the WHILE loop stops.
4. Do whatever is required before or after the WHILE is executed to ensure we solve the given problem.
We also presented an informal way to reason about the correctness of WHILE loops.
1. Show that the instruction works correctly when the initial situation results in the test being false.
2. Show that each time the loop body is executed, the robot's new situation is a simpler and similar version of the old situation.
We'd like to spend a little more time discussing this last concept of correctness. Remember that a robot will do exactly what it is told and only what it is told. It is up to us to make sure that it is provided with a correct way to solve a given problem. At the same time, we need a way to "prove" (in some sense) that our solution is correct. It will be impossible for us to simulate every possible situation, so we need a way to think through our solution in a formal way to verify that it does what it is supposed to do.
In order to reason about WHILE loops, we will need to understand a key concept called a loop invariant. A loop invariant is an assertion (something that can be proven true or false) which is true after each iteration of the loop. For our purposes, loop invariants will be assertions about the robot's world. In particular, the items that we need to be concerned about after ONE iteration are the following:
* How has the robot's direction changed, if at all?
* How has the robot's relative position in the world changed, if at all (this may involve thinking about wall segments as well)?
* How has the number of beepers in the robot's beeper-bag changed, if at all?
* How has the number and location of other beepers in the world changed, if at all?
Let's look at these items using the example given in section 6.2.4, clearAllBeepersToTheWall. After one iteration of the following loop,
while ( frontIsClear() )
{	move();
	pickBeeper();
}
what can we say (assert) about the items mentioned above? We can assert the following:
* The robot's direction is unchanged,
* The robot's position has been advanced one corner,
* That corner has one less beeper, and
* The robot's beeper-bag has another beeper.
Which of these statements are "interesting?" By "interesting" we mean which item is important in terms of the problem being solved. Since we're removing beepers from the world as the robot moves forward, we're interested in the second and third assertions. A loop invariant captures the interesting change during one iteration of the loop. Thus, for this problem, the loop invariant is that the robot has advanced one corner and removed one beeper from that corner.
What else have we learned? Let's look at our loop test, frontIsClear. When the loop ends, it will be false, thus the front will be blocked. So we know that when the loop terminates, the robot has removed one beeper from each corner it has passed and the robot's front is now blocked. We have learned that as long as each corner had one beeper on it, our loop must have solved the problem of picking up beepers to the wall.
Let's look at the fencepost problem presented in section 6.3.1. What is the loop invariant for the first attempt at solving that problem? Here's the loop:
while  ( frontIsClear() )
{	pickBeeper();
	move();
}
What can we assert about this loop?
* The robot's direction is unchanged.
* The robot's position has been advanced forward one corner.
* The previous corner has one less beeper.
* The robot's beeper-bag has one more beeper.
What do we know about the robot and the world when the loop finishes? We know that any previous corners have had one beeper removed from them. Finally, we know that the robot's front is blocked.
What about the robot's current corner? Since the loop invariant only mentions previous corners, we know nothing about the corner on which the robot is standing when the loop terminates--it may have a beeper, it may not. How we choose to remedy this situation is up to us, but at least in reasoning about the loop we have become aware of a potential problem with our loop--the fencepost problem.
Loop invariants can be powerful tools in aiding our understanding of how a loop is operating and what it will cause a robot to do. The key lies in determining how executing the loop changes the state of the world during each iteration and capturing that change as succinctly as possible. Once we've discovered the loop invariant, we can use it and the loop's termination condition to decide if the loop solves the problem. If not, we must look back over the steps for constructing a WHILE loop to see where we might have gone wrong.
Another use of loop invariants is to help us determine what instructions we want to use in the loop body. So far we've used the loop invariant as an after-the-fact device, to verify that a loop we've written solves a specific problem. If we decide what we want the invariant to be before we write the body of the loop, it can help in deciding what the body should be. As an example, consider the following problem: A robot is searching for a beeper that is an unknown distance directly in front of it and there may be some one-block high wall segments in the way.
What do we want to be true when the loop terminates? Since the robot is looking for a beeper, we want it to be next to a beeper. Thus, our test is ! nextToABeeper. What do we want to be invariant? The robot must move one (and only one) block forward during each iteration of the loop to ensure that each corner is examined. Our first pass at a loop might look like this:
while ( ! nextToABeeper() )
{	move();
}
Unfortunately, this will cause an error shutoff if we happen to run into one of those intervening wall segments before reaching the beeper. How can we maintain our invariant and still avoid the wall segment? A little insight might suggest the following modification:
while ( ! nextToABeeper() )
{	if ( frontIsClear() )
	{	move();
	}
	else
	{	avoidWall();
	}
}
where avoidWall is defined as:
public void avoidWall()
{	turnLeft();
	move();
	turnRight();
	move();
	turnRight();
	move();
	turnLeft();
}
In defining avoidWall, we must keep the loop invariant in mind. We want to make progress toward our goal, but as little progress as possible so that we don't accidentally miss something. We should spend some time convincing ourselves that this loop does indeed maintain the initial invariant: that the robot moves one (and only one) block forward during each iteration of the loop. If we can do this we can also convince ourselves that this loop does solve the problem.
In this section we will write a complex program by using stepwise refinement. Suppose that we need to patrol the perimeter of a rectanglar field of beepers. Imagine that there has been theft of the beepers and we need a robot guard to walk around the edge of the field. Let us build a class of Guard robots with a method walkPerimeter. The robot will initially be positioned somewhere in the field, perhaps, but not necessarily, on an edge.
To make the problem more definite, let's suppose that the field is at least two beepers wide and two beepers long. The path we want the robot to follow is one that walks along corners that actually contain the beepers marking the outer edge of the field. In the sample initial situation shown in Figure 6.14, the path should include 2nd and 9th Streets and 3rd and 7th Avenues.
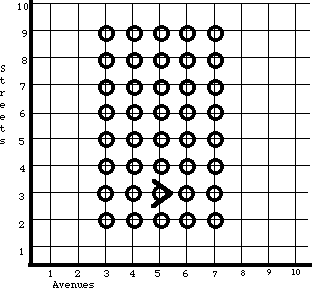
Figure 6.14 Initial Situation
As an initial strategy suppose that we walk our robot, say Tony, to the south-east corner and have it walk the perimeter from there. We may need other methods to help us build these, but a first approximation to our class definition is as follows.
public class Guard extends Robot
}	public void moveToSouthEastCorner()
	{
		...
	}

	public void walkPerimeter()
	{
		...
	}
	. . .
}
First, lets attack the walkPerimeter method, assuming that we can begin it at the south-east corner. Since it is easier for a robot to turn left (faster anyway) than to turn right, lets program the robot to walk around the field in a counter-clockwise direction, turning left at each corner. Since there are four edges to be walked we can use a loop instruction. For each execution of the body of the loop we should walk one edge and then turn left at the end of it.
public void walkPerimeter() // Robot begins at a corner of the field
{	loop(4)
	{	followEdge();
		turnLeft();
	}
}
This solution, of course, requires that we add an additional method, followEdge, to the Guard class. What does it take to follow an edge? Since the edge is marked by beepers the robot can simply move along it until there is no beeper on the current corner.
public void followEdge() //Robot starts on a corner with a beeper
{	while (nextToABeeper())
	{	move();
	}
}
If we try to simulate this by hand we find an error. After executing followEdge, Tony is left on a corner without any beepers. Since turnLeft doesn't change the corner, we find that after executing followEdge and then turnLeft once, we are not in a legal position to execute followEdge again. What actually happens when we execute followEdge, is that Tony walks outside the field and then turns completely around in place. Well, suppose that we have Tony back-up as the last step in followEdge, so that it is left on a corner with a beeper. Backing up requires that the robot be able to turn around. Thus we must add the following.
public void turnAround()
{	turnLeft();
	turnLeft();
}

public void backUp()
{	turnAround();
	move();
	turnAround();
}
Now we can correct followEdge.
public void followEdge() //Robot starts on a corner with a beeper
{	while (nextToABeeper())
	{move();
	}
	backUp();
}
Now our simulation seems to be correct, so we turn to moveToSouthEastCorner. To do this we can have the robot face south and then move until it is on the edge of the field, turn left and then walk until it reaches the corner. Facing south is not especially difficult since we have a test for facing south.
public void faceSouth()
{	while (! facingSouth())
	{	turnLeft();
	}
}
To move to the south edge of the field Tony now just needs to walk until there is no beeper on the current corner and then backup. But that is exactly what followEdge does.
public void moveToSouthEastCorner()
{	faceSouth();
	followEdge(); // Now at south edge of field
	turnLeft();
	followEdge(); // Now at south-east corner of field
}
Suppose that we add an additional post-condition to moveToSouthEastCorner and require that it turn at the end of its walk to put the field to the left of the robot. We can establish this by adding a turnLeft to the end of moveToSouthEastCorner.
public void moveToSouthEastCorner()
{	faceSouth();
	followEdge(); // Now at south edge of field
	turnLeft();
	followEdge();
	turnLeft(); // Now at south-east corner of field facing North
}
Now, when we similate our robot, it will correctly follow all four edges of the
field of Figure 6.14. When we try it in other legal fields, however, we find that
we have trouble. For example, we find that Tony will execute an error shutoff
in trying to patrol the field of Figure 6.15.
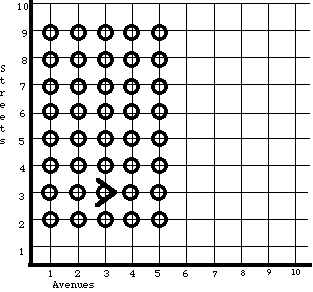
Figure 6.15 Another Initial Position
We call this type of situation a beyond-the-horizon situation. Normally, we write a program guided by a few initial situations that seem to cover all interesting aspects of the task. Although we would like to prove that all other situations are not too different from these sample situations, frequently the best we can do is hope. As we explore the problem and learn more about the task, we may discover situations that are beyond our original horizons--situations that are legal, but special trouble-causing cases. Once we suspect a beyond-the-horizon situation, we should immediately simulate a robot's execution in it. If our suspicions are confirmed, and the robot does not perform as we intended, we must modify our program accordingly.
We must reprogram the robot to realize that it is at the edge of a field as soon as it contacts a wall, as well as when it is no longer at a beeper. Since all of our edge sensing is in followEdge, we look there for a solution.
Here is a solution in which we need stop moving when either !nextToABeeper OR !frontIsClear become true. Therefore, the opposite of this is our condition for continuing to move. We want to say
while (nextToABeeper() AND frontIsClear()) ...
This is a natural place for a new predicate. It is quite simple.
public boolean nextToABeeper_and_frontIsClear()
{	if( nextToABeeper() )
	{	return frontIsClear();
	}
	return false;
}
It will be instructive, however to try to use nested constructs as in Chapter 4. Here, however we have WHILE instructions and not IF instructions. Often the correct solution to this is to nest an IF instruction inside of a WHILE instruction. Suppose we try each of the following to see if they might help us here.
while(nextToABeeper())			while(frontIsClear())
{	if(frontIsClear())		{	if(nextToABeeper())
	{	move();				{	move();
	}					}
}					}
The second one seems clearly wrong, since once a robot begins executing, execution will continue until it encounters a wall. Since walls aren't necessarily part of the problem, the robot will walk too far afield.
The first also seems to be ok until we simulate it in our beyond-the-horizon situation, in which it will continue to execute forever. The problem is that when we encounter the wall we are still on a corner with a beeper and so we don't exit from the while. We can solve this, however, by picking up the beeper in this situation.
while(nextToABeeper())
{	if(frontIsClear())
	{	move();
	}
	else
	{	pickBeeper();
	}
}
Now we will exit, but must replace the beeper that we may have picked up. After we exit this while loop, we know that there is no beeper on the current corner, but we don't know if we picked one up or not. We could simply ask the robot to put a beeper if it has any, but this requires that the robot begin with no beepers in its beeper-bag. What else do we know? Well, we know that if we picked up a beeper it was because our front was blocked and we haven't moved or turned so its front must still be blocked in that case. If it is not blocked, it is because we have walked off the edge of the field to an empty corner.
public void followEdge() //Robot starts on a corner with a beeper
{	while(nextToABeeper())
	{	if(frontIsClear())
		{	move();
		}
		else
		{	pickBeeper();
		}
	}
	if(frontIsBlocked())
	{	putBeeper();
	}
	else
	{	backUp();
	}
}
Well, as it often happens in programming, just when we think we have a solution to a programming problem, the problem changes. When the owner of the field saw our above solution in action, she observed that the robot wasn't going to be especially effective in preventing beeper theft, since, while Tony was walking along one edge, someone could steal beepers by entering from the opposite edge. To prevent this, she has changed the specification of the problem to require four robots, starting the four corners of the field, all walking in unison, to keep better watch. We will look at this problem in Chapter 6.
In the last two chapters we have used Enumerations in simple ways. Finally we can see the real intent of the Enumeration interface and how it was intended to be used. Suppose you have a robot that has just arrived on a corner and it needs to do somethig with all the robots there, perhaps telling them to lay down their beepers. This is very simple with the combination of the neighbors enumeraton and a while loop.
Enumeration neighbors = neighbors();
while(neighbors.hasMoreElements())
{
	ur_Robot myNeighbor = (ur_Robot)neighbors.nextElement();
	myNeighbor.putBeeper();
}
You may, of course, write your own Enumerations. You need to implement the Enumeration interface, of course, but it is also useful to keep in mind the philosophy of an enumeration. First is that the hasMoreElements method returns true or false, but does not modify the collection being enumerated. It makes no state changes in the collection or in the enumeration itself. On the other hand, nextElement, in addition to returning a value if there is one to return, should update its own internal data so that the next time either hasMoreElements or nextElement is called they will do the right thing. Finally, if nextElements is called when there are no more elements, it should "throw" a NoSuchElementException. The discussion of that is beyond the scope of this book.
As explained at the end of the last chapter, a decision map is a technique that asks questions about the problem we are trying to solve. The answers to the questions determine which path of the map to follow. If we have done a thorough job of planning our implementation, the decision map should suggest an appropriate instruction to use. Take some time and examine some of the discussions presented in this chapter and see how the complete decision map, which is presented below, might have been useful.
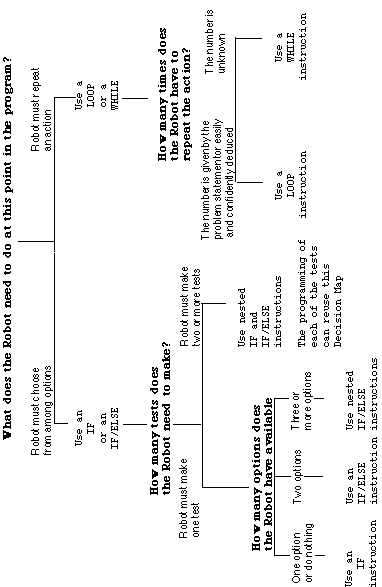
Figure 6-16 A Complete Decision Map
repetition
iteration
fence post problem
infinite execution
loop invariant
The problems in this section require writing definitions and programs that use FOR-LOOP and WHILE instructions. Try using stepwise refinement and the four step process discussed in Section 6.2.3 when writing these definitions and programs. Test your solutions by simulating them in various initial situations, and try to find beyond-the-horizon situations too. Take care to write programs that avoid error shutoffs and infinite loops.
A common mistake among beginning programmers is trying to have each execution of a while loop's body make too much progress. As a rule of thumb, try to have each execution of a WHILE loop's body make as little progress as possible (while still making some progress toward terminating the loop).
1. Write a new method named emptyBeeperBag. After a robot executes this method, its beeper-bag should be empty.
2. Write a new method called goToOrigin that positions a robot on 1st Street and 1st Avenue facing east, regardless of its initial location or the direction it is initially facing. Assume that there are no wall sections present. Hint: Use the south and west boundary walls as guides.
3. Study both of the following program fragments separately. What does each do? For each, is there a simpler program fragment that is execution equivalent? If so, write it down; if not, explain why not.
while( ! nextToABeeper())		while( ! nextToABeeper())
{	move();				{	if(nextToABeeper())
}						{	pickBeeper();
if(nextToABeeper())				}
{	pickBeeper();				else
}						{	move();
else						}
{	move();				}
}
Describe the difference between the following two program fragments:
while(frontIsClear())			if(frontIsClear())
{	move();				{	move();
}					}
4. There is a menace in Karel's world--an infinite pile of beepers. Yes, it sounds impossible but occasionally one occurs in the world. If Karel accidentally tries to pick up an infinite pile of beepers, it is forever doomed to pick beepers from the pile. Karel's current situation places the robot in grave danger from such a pile. The robot is standing outside two rooms: one is to the west and one is to the east. Only one of these rooms has a pile of beepers that Karel can pick. The other room has the dreaded infinite pile of beepers. Karel must decide which room is the safe room, enter it and pick all of the beepers. To help the robot decide which room is safe, there is a third pile of beepers on the corner at which Karel is currently standing. If this third pile has an even number of beepers, the safe room is the eastern room. If the pile has an odd number of beepers, the safe room is the western room. There is at least one beeper in the third pile. Program Karel to pick the beepers in the safe room.
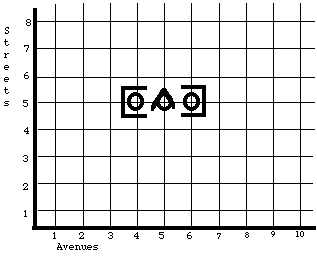
Figure 6-17 A Very Dangerous Task
...
29. Write a Spy Walk program (See Chapter 4) that continues until the Spy arrives on a corner with no Accomoplice robot. This is the treasure corner and it should be marked with three beepers. The Spy should end by picking up these three beepers. Test your program using at least 4 Accomplices and at least three strategies. You may assume there are no other robots in the world besides the single Spy and the Accomplices.
30. After doing (or at least thinking about) Problem 29, go back and answer Problem 2 of Chapter 4.
31. Suppose a robot arrives on a corner with a lot of other robots of different classes, some of which have overridden the move method in various ways. What happens if we use the enumeration provided by the neighbors method of this new arrival to send a move message to each of the other robots on this corner?
32. Use the idea of Problem 31 to write a program to build a house using a Contractor and a work crew, where the contractor doesn't even need to know how many robots are in the crew or their types. Be as creative as you like. The contractor will just tell each member of the team where the house is to be built by passing a strategy to each.
Remaining exercises omitted.